Monday, September 30, 2013

Microsoft Dynamics AX 2012 in Windows Azure (IaaS) – Using Existing VHD

Microsoft Dynamics AX 2012 in Windows Azure (IaaS) – Using Existing VHD
 
Purpose: The purpose of this document is to explain how to deploy Microsoft Dynamics AX 2012 in Windows Azure platform (Infrastructure-as-a-Service (IaaS)) using existing VHD (Virtual Hard Drive). 
 
Challenge: You may want to deploy Microsoft Dynamics AX 2012 as Infrastructure-as-a-Service (IaaS) for the purposes of POC (Proof of concept), in case you want to have additional development or test environment, or if you are considering deploying production instance of Microsoft Dynamics AX 2012 in the Cloud. There're number of options when deploying Microsoft Dynamics AX 2012 in the Cloud including Windows Azure platform. And in many cases you already have a virtual machine which you have built locally, and you want to deploy this virtual machine to the Cloud as Windows Azure VM.
 
Solution: To store files and data in the Blob, Table, and Queue services in Windows Azure, you can create a storage account in the geographic region where you want to store the data. A Windows Azure virtual machine is created from an image or a disk. All virtual machines use one operating system disk, a temporary local disk, and possibly multiple data disks. All images and disks, except the temporary local disk, are created from virtual hard disks (VHDs), which are .vhd files stored as page blobs in a storage account in Windows Azure. You can use platform images that are available in Windows Azure to create virtual machines, or you can upload your own images to create customized virtual machines. The disks that are created from images are also stored in Windows Azure storage. You can easily create new virtual machines from existing disks.
 
Scenario
 
In this scenario I want to deploy existing VHD which contains Microsoft Dynamics AX 2012 installation to Windows Azure platform (Infrastructure-as-a-Service (IaaS)). In particular I want to establish Microsoft Dynamics AX 2012 Demo environment in Windows Azure using Microsoft Dynamics AX 2012 A Demo VM which you can download from Partner Source here.
 
Walkthrough
 
Please note that there's a tutorial available on how to upload VHD which contains Windows Server OS to Windows Azure: http://www.windowsazure.com/en-us/manage/windows/common-tasks/upload-a-vhd/. However there're number of nuances about Microsoft Dynamics AX 2012 A Demo VM which I will describe in this document. That's why please review the rest of this document before you take further actions.
 
We will start off with creation of Windows Azure Storage account as described below
 
Storage
 
 
After that we can create a container to put our VHD file into
 
Containers
 
 
The initial idea would be to upload VHD file and create an image based on it. And at this step we want to make sure that our VHD file is not bigger than 128GB because currently there's a limitation related to VHD upload to Windows Azure which states that VHDs up to 128GB are allowed
 
In case you upload Microsoft Dynamics AX 2012 A Demo VM to Windows Azure Storage account
 
 
You will end up with 175GB VHD
 
VHDs
 
 
And you will see the following error "VHD has invalid size XGB. Permitted values are between 0 and 128GB" when you'll try to create an image based on this VHD
 
 
Now if we look at Microsoft Dynamics AX 2012 A Demo VM its total size is 175GB. Please note that there's about 70GB of free space there
 
Disk Management
 
 
Now we can look at possibilities to shrink VHD using standard Shrink function and we'll see that we can actually shrink it to about 128GB
 
Disk Management
 
 
We can further explore options on how to shrink it even more using Disk Cleanup function and again there's such possibility (-1GB) which brings us to 127GB desired size
 
Disk Management
 
 
Please note that after you shrink a disk using Disk Management Shrink function shrank space becomes Unallocated and VHD size is still 175GB. That's why we need to resize VHD properly to desired size of 127GB. In this scenario I used VHDResizer utility which you can download for free in the internet
 
VHDResizer 
 
 
Please note that another important point is to change the type of VHD from Dynamic to Fixed to control its size after we upload it to Windows Azure Storage account. I also specified new size of 127GB which is smaller than 128GB limit
 
Please note that technically we could use Resize-VHD command in Windows Server 2012: http://technet.microsoft.com/en-us/library/hh848535.aspx. But currently the only VHD format is supported in Windows Azure for creation of images, and Resize-VHD command only works for VHDX format
 
After you resize VHD you can give unallocated space back to VM in Disk Management by using Extend function. This is why if I now run this VM locally (Hyper-V) I can see the C: drive has actual size of 127GB. Exactly what I need for now!
 
Disk Management
 
 
Now we can finally upload VHD to Windows Azure Storage account using Windows Azure PowerShell Cmdlet as shown below
 
Windows Azure PowerShell
 
 
Please note that upload may take a while depending on the speed of your internet (upload speed)
 
The resulting outcome may look like the following
 
PS C:\> Add-AzureVhd -Destination http://alex.blob.core.windows.net/vhds/AX2012R2A-v3.vhd -LocalFilePath "D:\MicrosoftDynamicsAX2012\Virtual Hard Disks\AX2012R2A-v3.vhd"
MD5 hash is being calculated for the file D:\MicrosoftDynamicsAX2012\Virtual Hard Disks\AX2012R2A-v3.vhd.
MD5 hash calculation is completed.
Elapsed time for the operation:
Creating new page blob of size ...
Elapsed time for upload:
 
LocalFilePath                                               DestinationUri
-------------                                               --------------
D:\MicrosoftDynamicsAX2012\Virtual Hard Disks\AX20... http://alex.blob.core.windows.net/vhd...
 
 
Now we can double check that the size of VHD uploaded is smaller than 128GB
 
VHDs
 
 
Another important consideration is that for creation of images in Windows Azure based on VHD you have to sysprep the image (on VHD) itself
 
Please note that if you upload VHD which is not sysprep-ed in Windows Azure Storage account and then try to create an image based on it you will run into "Running (Provisioning Timed Out)" problem. This basically means that after you launch Windows Azure VM (created based on the not sysprep-ed image) your Windows Azure VM will show "Running (Provisioning Timed Out)" status and you will not be able to use it
 
Virtual Machines
 
 
Please note that even after you sysprep Microsoft Dynamics AX 2012 A Demo VM you may not be able to launch it after that because of hardware drivers errors. Also there're more considerations about sysprep-ing machines with Microsoft SQL Server and Microsoft SharePoint Server installed
 
That's why I decided to convert uploaded VHD into Disk instead of Image and then attach this Disk to the Windows Azure VM. Let's move on … Currently I don't have any Virtual Machines created
 
Virtual Machines
 
 
I will switch over to Disks
 
Disks
 
 
And create a new Disk based on uploaded VHD
 
Create a disk from a VHD
 
 
Please note that I attached uploaded VHD to the Virtual Machine Disk and also specified that VHD contains Windows OS
 
Browse Cloud Storage
 
 
Now we can see Disk in the list. Please note that this disk has not been attached to the Virtual Machine yet
 
Disks
 
 
As a next step we can create Virtual Machine based on the Disk
 
Create a Virtual Machine – Virtual Machine image selection
 
 
Then I can define the size of Virtual Machine and user credentials. Please note that I specified "A7 (8 cores, 56GB memory) size because Microsoft Dynamics AX 2012 A Demo VM is a single-box install of Microsoft Dynamics AX 2012
 
Create a Virtual Machine – Virtual Machine configuration
 
 
Create a Virtual Machine – Virtual Machine configuration
 
 
Create a Virtual Machine – Virtual Machine configuration
 
 
At last Virtual Machine has been created, started and now it is Running
 
Virtual Machines
 
 
In case you want to monitor the availability and performance of applications that are running on Windows Azure you can use standard Dashboards and Views on Windows Azure Portal online
 
 
Or you can locally install System Center Monitoring Pack for Windows Azure Applications: http://www.microsoft.com/en-us/download/details.aspx?id=11324
 
Now you can Connect to it through RDP
 
Microsoft Dynamics AX 2012: Success!
 
 
In conclusion let's quickly summarize the key points about Custom Images and Disks in Windows Azure
 
Speaking about Images: You can upload VHDs up to 128GB size to create an image based on it. Your images will be available in the gallery under "My Images". You will have to sysprep image before upload. VHD format is required, VHDX does not work (to convert you can use Actions > Edit disk). VHD must have Fixed type and not Dynamic. You can upload VHD using Add-AzureVhd Cmdlet.
 
Speaking about Disks: C: drive is persistent, uses storage as a backing store. D: is a temporary drive. The size of the machine affects data disk use cases. Your disks will be available in the gallery under "My Disks". From performance and scaling perspective temp disk is fast, but volatile, you can also attach multiple disks and stripe data between them to increase throughput. Disk performance factors are significantly different from on premise solutions that's why you will want to test the performance early. For Performance Guidance for SQL Server in Windows Azure Virtual Machines please review the following White Paper: http://download.microsoft.com/download/D/2/0/D20E1C5F-72EA-4505-9F26-FEF9550EFD44/Performance%20Guidance%20for%20SQL%20Server%20in%20Windows%20Azure%20Virtual%20Machines.docx
 
Summary: This document describes how to deploy Microsoft Dynamics AX 2012 Demo environment in Windows Azure platform (Infrastructure-as-a-Service (IaaS)) using existing VHD (Virtual Hard Drive). Please note that in described deployment of single-box installation of Microsoft Dynamics AX 2012, and you can deploy distributed installation of Microsoft Dynamics AX 2012 if needed using existing VHDs and/or newly deployed Virtual Machines in any combination.  Please learn more about Windows Azure storage here: http://www.windowsazure.com/en-us/develop/net/fundamentals/cloud-storage/. Please also get familiar with details of how to manage Windows Azure Disks and Images here: http://msdn.microsoft.com/en-us/library/windowsazure/jj672979.aspx

Author: Alex Anikiev, PhD, MCP
 
Tags: Microsoft Dynamics AX 2012, Windows Azure, Microsoft Cloud, IaaS, Infrastructure as a Service, Demo VM, Storage account, Image, Disk
 
Note: This document is intended for information purposes only, presented as it is with no warranties from the author. This document may be updated with more content to better outline the concepts and describe the examples.

Microsoft Dynamics AX 2012 in Windows Azure (IaaS) – RDS Published App

Microsoft Dynamics AX 2012 in Windows Azure (IaaS) – RDS Published App
 
Purpose: The purpose of this document is to explain how to deploy Microsoft Dynamics AX 2012 in Windows Azure platform (Infrastructure-as-a-Service (IaaS)) as RDS (Remote Desktop Services) published app. 
 
Challenge: You may want to deploy Microsoft Dynamics AX 2012 as Infrastructure-as-a-Service (IaaS) for the purposes of POC (Proof of concept), in case you want to have additional development or test environment, or if you are considering deploying production instance of Microsoft Dynamics AX 2012 in the Cloud. There're number of options when deploying Microsoft Dynamics AX 2012 in the Cloud. And when it comes to client deployment you may want to deploy it as RDS (Remote Desktop Services) published app to facilitate user's access to the environment.
 
Solution: Remote Desktop Services is one of the components of Microsoft Windows that allows a user to access applications and data on a remote computer over a network using the Remote Desktop Protocol (RDP). In Windows Server 2012 you can either publish the RemoteApps on the Remote Desktop Session Host server (RDSH) or you can publish the full blown desktop.
 
Scenario
 
In this scenario I want to deploy Microsoft Dynamics AX 2012 in Windows Azure platform (Infrastructure-as-a-Service (IaaS)) as RDS (Remote Desktop Services) published app. Essentially users will be able to launch Microsoft Dynamics AX 2012 from their local desktops just like any other local application even though Microsoft Dynamics AX 2012 client will be actually installed in Windows Azure VM. Please note that I'll install RDS role on the developer install of Microsoft Dynamics AX 2012 on Windows Server machine and this machine will also act as a Domain Controller (this is also the case for Microsoft Dynamics AX 2012 Demo VM A).
 
Walkthrough
 
Before we begin it is important to mention that if you want to install RDS on the machine which also acts as a domain controller you will have to apply KB2871777 first. A servicing stack update is available for Windows RT, Windows 8, and Windows Server 2012: September 2013, and it enables you to install the Remote Desktop Connection Broker role service on a domain controller.
 
Please find KB2871777 here: http://support.microsoft.com/kb/2871777
 
Please install KB2871777 before you install RDS and Domain Controller Services Roles to avoid installation errors
 
Windows Update Standalone Installer
 
 
Once KB2871777 is installed and you rebooted the machine we can first install Domain Controller Services Role and establish a domain. I'll not describe Domain Controller installation process in this document (it is described in my article here: http://ax2012aifintegration.blogspot.com/2013/08/microsoft-dynamics-ax-2012-in-windows.html)
 
And finally after that we can get to RDS Role installation
 
First off I'll select Remote Desktop Services installation option
 
Add Roles and Features Wizard – Installation Type: Remote Desktop Services installation
 
 
For the sake of simplicity I'll further go with Quick Start option which installs a required minimum RDS components and deploys number of default published apps
 
Add Roles and Features Wizard – Deployment Type: Quick Start
 
 
Please note that if you haven't joined the machine to the domain (in my case the machine will act as Domain Controller itself) you will see the following error
 
Remote Desktop Services installation option
 
 
After that I'll select Session-based desktop deployment
 
Add Roles and Features Wizard – Deployment Scenario: Session-based deployment
 
 
And select my server
 
Add Roles and Features Wizard – Server Selection
 
 
Next you may see the following compatibility error which can be resolved by enabling PSRemoting in Windows PowerShell
 
Checking compatibility
 
 
This is exactly what we're going to do. Please run "enable-psremoting" command in Windows PowerShell to pass through this compatibility error
 
Windows PowerShell
 
 
Please run Windows PowerShell as Administrator (with elevated privileges) to execute this command
After that before you start deployment you'll have to confirm that the following role services will be installed
<![if !supportLists]>-          <![endif]>RD Connection Broker
<![if !supportLists]>-          <![endif]>RD Web Access
<![if !supportLists]>-          <![endif]>RD Session Host
 
Add Roles and Features Wizard - Confirmation
 
 
At last we get a confirmation about successful installation
 
Add Roles and Features Wizard – Completion: Success!
 
 
Again please note RDS installation fails on Windows Server in case you didn't install KB2871777 as was described before. Upon successful installation we can now access RDWeb web page: https://localhost/RDWeb
 
Work Resources: RemoteApp and Desktop Connection (Login)
 
 
After you successfully login you will be able to see the list of default published apps
 
Work Resources: RemoteApp and Desktop Connection (Published Apps)
 
 
Also in Server Management console you will see the indication that Remote Desktop Services role has been successfully deployed
 
Remote Desktop Services
 
 
Now the task is to publish Microsoft Dynamics AX 2012 as RDS published app too. For this purpose we'll review RDS Published apps collection and click Task > Publish RemoteApp Programs
 
Server Manager > Remote Desktop Services > Collections > QuickSessionCollection
 
 
The dialog will appear then which allows you to select programs to be published. We are certainly interested in publishing Microsoft Dynamics AX 2012 client application, so we'll select it in the list
 
Publish RemoteApp Programs – RemoteApp programs
 
 
Publish RemoteApp Programs - Confirmation
 
 
Upon confirmation Microsoft Dynamics AX 2012 client application will be published
 
Publish RemoteApp Programs - Completion
 
 
Finally you will see it listed in the RemoteApp programs collection
 
Server Manager > Remote Desktop Services > Collections > QuickSessionCollection: Success!
 
 
Now we can login to RDWeb web page again: https://localhost/RDWeb
And we'll see Microsoft Dynamics AX 2012 is now available there
 
Work Resources: RemoteApp and Desktop Connection (Published Apps)
 
 
Please note that when you launch Microsoft Dynamics AX 2012 as RDS Published App you will see a different icon (on the left) in the programs bars. This icon is different from the icon which corresponds to Microsoft Dynamics AX 2012 client application launched locally (on the right)
 
 
As the result Microsoft Dynamics AX 2012 client will be opened in a Web browser but it will look exactly like any other local application you launch on your computer
 
Microsoft Dynamics AX 2012
 
 
Please note that you can list RDS Published apps along with your local applications
 
Summary: This document describes how to deploy Microsoft Dynamics AX 2012 in Windows Azure platform (Infrastructure-as-a-Service (IaaS)) as RDS (Remote Desktop Services) published app. Before you install RDS (Remote Desktop Services) please review RDS (Remote Desktop Services) licensing model. Please learn more about RDS (Remote Desktop Services) here: http://technet.microsoft.com/en-us/windowsserver/ee236407.aspx
 
Author: Alex Anikiev, PhD, MCP
 
Tags: Microsoft Dynamics AX 2012, Windows Azure, Microsoft Cloud, IaaS, Infrastructure as a Service, RDP, Remote Desktop Protocol, RDS, Remote Desktop Services, Published App
 
Note: This document is intended for information purposes only, presented as it is with no warranties from the author. This document may be updated with more content to better outline the concepts and describe the examples. 

Saturday, September 21, 2013

Microsoft Dynamics AX 2012 + Yammer

Microsoft Dynamics AX 2012 + Yammer
 
Purpose: The purpose of this document is to illustrate how to integrate Microsoft Dynamics AX 2012 and Yammer.
 
Challenge: The world moves fast. Change is the new constant. In the fast moving world there’s a need for the solution that helps you and your company stay on top of it all. Get connected to the right people, share information across teams and organize around projects so you can go further – faster. Collaborate securely across departments, geographies, content and business applications.
 
Solution: The solution is Yammer. Yammer is a leading enterprise social network used by many companies worldwide to get work done smarter and faster.
 
Scenario
 
In this scenario we’ll configure Microsoft Dynamics AX 2012 Role Center to display Yammer feed
 
Walkthrough
 
 
This is how my Yammer landing page looks like
 
 
Please note that in Apps section (… > Apps) you can find a reference to Yammer Embed App which allows you to embed a Yammer feed to any web page using intuitive JavaScript code
 
 
Yammer Embed: Bring social into existing business applications.
 
Yammer Embed delivers Yammer feeds to existing business applications, such as the company intranet, CRM tools or content management systems. With Yammer Embed, you can now view, post and reply to messages in the context of your work.
 
Please see the benefits of using Yammer Embed App:
 
Increased Flexibility: Add Yammer's social functionality to existing applications using simple JavaScript embed code
 
Uninterrupted Work Flow: Have dynamic team discussions in the context of the projects you're working on, without disrupting natural work flows
 
Accelerated Content Discovery: Enable other members of the company to discover and participate in your conversations in real-time, even if they are not using the same application
 
Mobile Access: Contribute to conversations happening inside other applications from mobile devices
A note about compatibility: Yammer Embed is compatible with any HTML and JavaScript-based business system that supports extensibility. Yammer Embed dynamically adjusts in size and design based on the amount of space provided within an application.
 
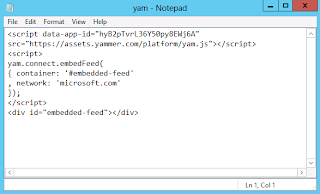
Yammer Embed App comes with a manual with detailed instructions. For example, this is how my JavaScript code looks like 
 
Code
 
<script data-app-id="hyB2pTvrL36Y50py8EWj6A"
src="https://assets.yammer.com/platform/yam.js"></script>
<script>
yam.connect.embedFeed(
{ container: '#embedded-feed'
, network: 'microsoft.com' // network permalink
});
</script>
<div id="embedded-feed"></div>
 
Please note that I’m using a microsoft.com network in my example: https://www.yammer.com/microsoft.com/
 
Now once we wrote the code and before we embed it into Microsoft Dynamics AX 2012 Role Center we’ll save the code in text file
 
File (Save As yam.txt)


This saved file we’ll upload to Shared Documents on our SharePoint site to be able to reference it later
 
For example, this is where I uploaded this file to on Microsoft Dynamics AX 2012 Demo VM: http://dynamicsax.contoso.com/sites/DynamicsAx/Shared%20Documents/Forms/AllItems.aspx
 
Shared Documents
 
<![if !vml]><![endif]>
Now we can see uploaded yam.txt file to Shared Documents in SharePoint site. The URL we’ll use to reference this file will be: http://dynamicsax.contoso.com/sites/DynamicsAx/Shared%20Documents/yam.txt
 
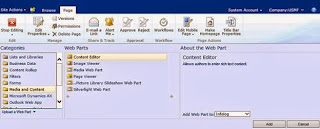
Now it’s time to embed JavaScript code into Microsoft Dynamics AX 2012 Role Center using Content Editor web part
 
Edit Page: Content Editor


In the Content Link we’ll specify the URL for yam.txt file which we uploaded to Shared Documents in SharePoint site
 
 
The URL looks like the following in Text Editor
 
 
Then we’ll do some more make-up such as specifying web part Title, etc.
 
 
And finally we’ll have Yammer feed embedded into Microsoft Dynamics AX 2012 Role Center
 
Edit Page
 
 
After you Log in you will be able to see the result
 
 
Result in Microsoft Dynamics AX 2012 Role Center
 
 
Summary: This document describes how integrate Microsoft Dynamics AX 2012 and Yammer by displaying Yammer feed in Microsoft Dynamics AX 2012 Role Center. Start using Yammer today to realize the following business benefits: https://about.yammer.com/business-benefits
 
Drive Productivity through Team Collaboration: Increased sales. Better customer service. More effective processes. When your team works together, amazing things happen. Yammer improves team collaboration to help you share ideas, spur creativity and make decisions more quickly.
 
Engage Every Employee: An engaged workforce means good things for business: higher productivity, higher profitability and lower turnover. Yammer increases employee engagement so that every team member has a voice – and the tools and information to do more.
 
Connect Your Organization: Welcome to a new kind of intranet. It’s social, easy to use and brings employees and applications together in a connected organization. Like traditional intranets, Yammer is a knowledge hub for enterprises – and so much more.
 
Boost Business Agility: Innovate new products and adapt quickly to market changes. Yammer drives business agility through open communication to help your company stay one step ahead.
 
Please learn more about Yammer here: https://www.yammer.com
 
Tags: Microsoft Dynamics AX 2012, Yammer, Social, Collaboration.
 
Note: This document is intended for information purposes only, presented as it is with no warranties from the author. This document may be updated with more content to better outline the issues and describe the solutions.
 
Author: Alex Anikiev, PhD, MCP